Wednesday, March 5, 2014
Gerrit Rietveld June 24 1888 June 26 1964
An extraordinary dutch furniture maker and architect, was influenced by the De Stijl movement. The De Stijl movement favored a simplistic form and color in furniture; the form was reduced to vertical and horizontal lines and the colors were strictly primaries along with black and white.
Reitvelds Red and Blue Chair, as shown above was made in 1917 and after being influenced by the De Stijl movement, painted it with primaries along with black and white. This unique form and use of color became quintessential to Reitvelds work, until he broke off in 1928. He then succeeded his last style of architecture with a new one, it was called: Nieuwe Zakelijkheid. This new form of architecture entailed design which was a bit more angular, and free of decoration. Another example of his work influenced by the Nieuwe Zakelijkheid, was the Zig-Zag chair:
 This chair was not only a unique piece of furniture it is a work of genius. I am very influenced by this chair, and would like to use Gerrit Rietvelds aesthetic to complete my designs in this woodworking class. Rietvelds philosophy was always simple and never too decorated or ornamented. What I enjoy most about his pieces are his divine taste in simple and sophisticated structure, and I would like to make my work resemble his work (with my own touch of course).
Rough Cut Director Gets Emmy Nomination
Tommy MacDonald and Rough Cut director Laurie Donnelly
Photo: Courtesy WGBH Boston
Rough Cut--Woodworking with Tommy Mac is getting some attention from the TV industry. The show just won a Bronze Telly Award, which honors the best local, regional, and cable TV commercials and programs. But thats not all. Director Laurie Donnelly has been nominated for a Daytime Emmy Award in the Outstanding Directing in a Lifetyle/Culinary Program category.
The show, produced by WGBH Boston and sponsored by Woodcraft, features woodworker Tommy MacDonald, a North Bennet Street graduate and pro woodworker, who demonstrates traditional woodworking techniques in a truly Bostonian manner--wicked accent and all.
Donnelly, who is executive producer for lifestyle programming at WGBH, is not new to industry accolades, having won both Emmy and Peabody Awards in the past. "It is a great honor to be recognized in this way. Rough Cut has come together, thanks to the hard work of our host, Tommy MacDonald, and an amazing production team,” Donnelly said. “Together weve aimed to push the envelope in the world of woodworking as its presented on-air. We are also deeply committed to delivering something meaningful for anyone who has the passion to pick up a tool in their workshop---or to be an armchair participant watching and learning from home."
Rough Cut begins its second season in October. Emmy winners will be announced June 17.
I wonder if the statue is available in mahogany...
Click Here and Start WoodWorking
A Sight 4 Saw Eyes
Its a happy day! After waiting for over 3 weeks, I finally have my saws back from being sharpened.
As mentioned previously I have been given some saws (1,3 and 4) which I promptly de-rusted, cleaned and oiled and sent off for sharpening as follows:

1. Warranted Superior 26" - 5ppi RIP
2. Sandvik 22" - 10ppi RIP
3. NoName 21.5" - 8ppi Crosscut
4. Warranted Superior 20" - 10ppi Crosscut
All saws have been jointed flat and resharpened and set, each costing £10.50. I will get myself some files and a saw set to learn to do it myself eventually but for now, for just over £40 I should be able to cover most of my larger sawing requirements - bargain!
Unfortunately, the guy who normally does the sharpening has been on holiday, hence the delay, the service normally only takes a week. If anyone in the Surrey area is interested, the company who carried out the sharpening is Winsor Saw Ltd of Windsor 01753 862029, but you can also drop off and collect saws from Village Mowers in Hersham, Surrey 01932 248538.
Aside from my Lie Nielson backsaws (a crosscut carcass saw and a dovetail saw), which I use all the time. I still need (would like) a larger tenon saw. Common sense suggests something like a 400mm 10ppi rip saw as the largest cuts are with the grain when cutting a tenon, but would it still be suitable for making precision crosscuts when my carcass saw is a bit small ... or should I just try and do precision cuts with the panel saws above ... decisions decisions.
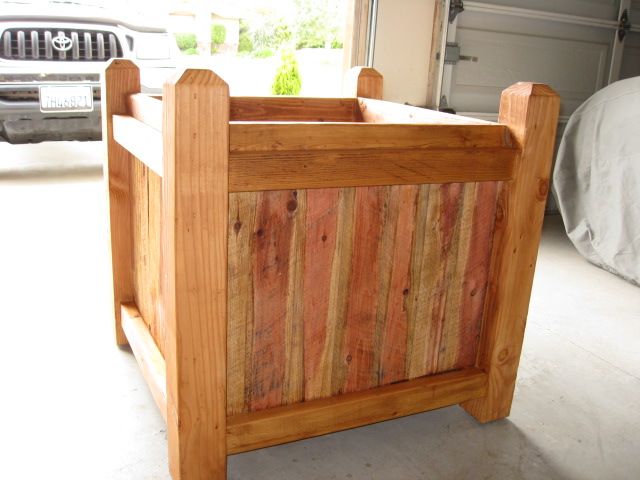
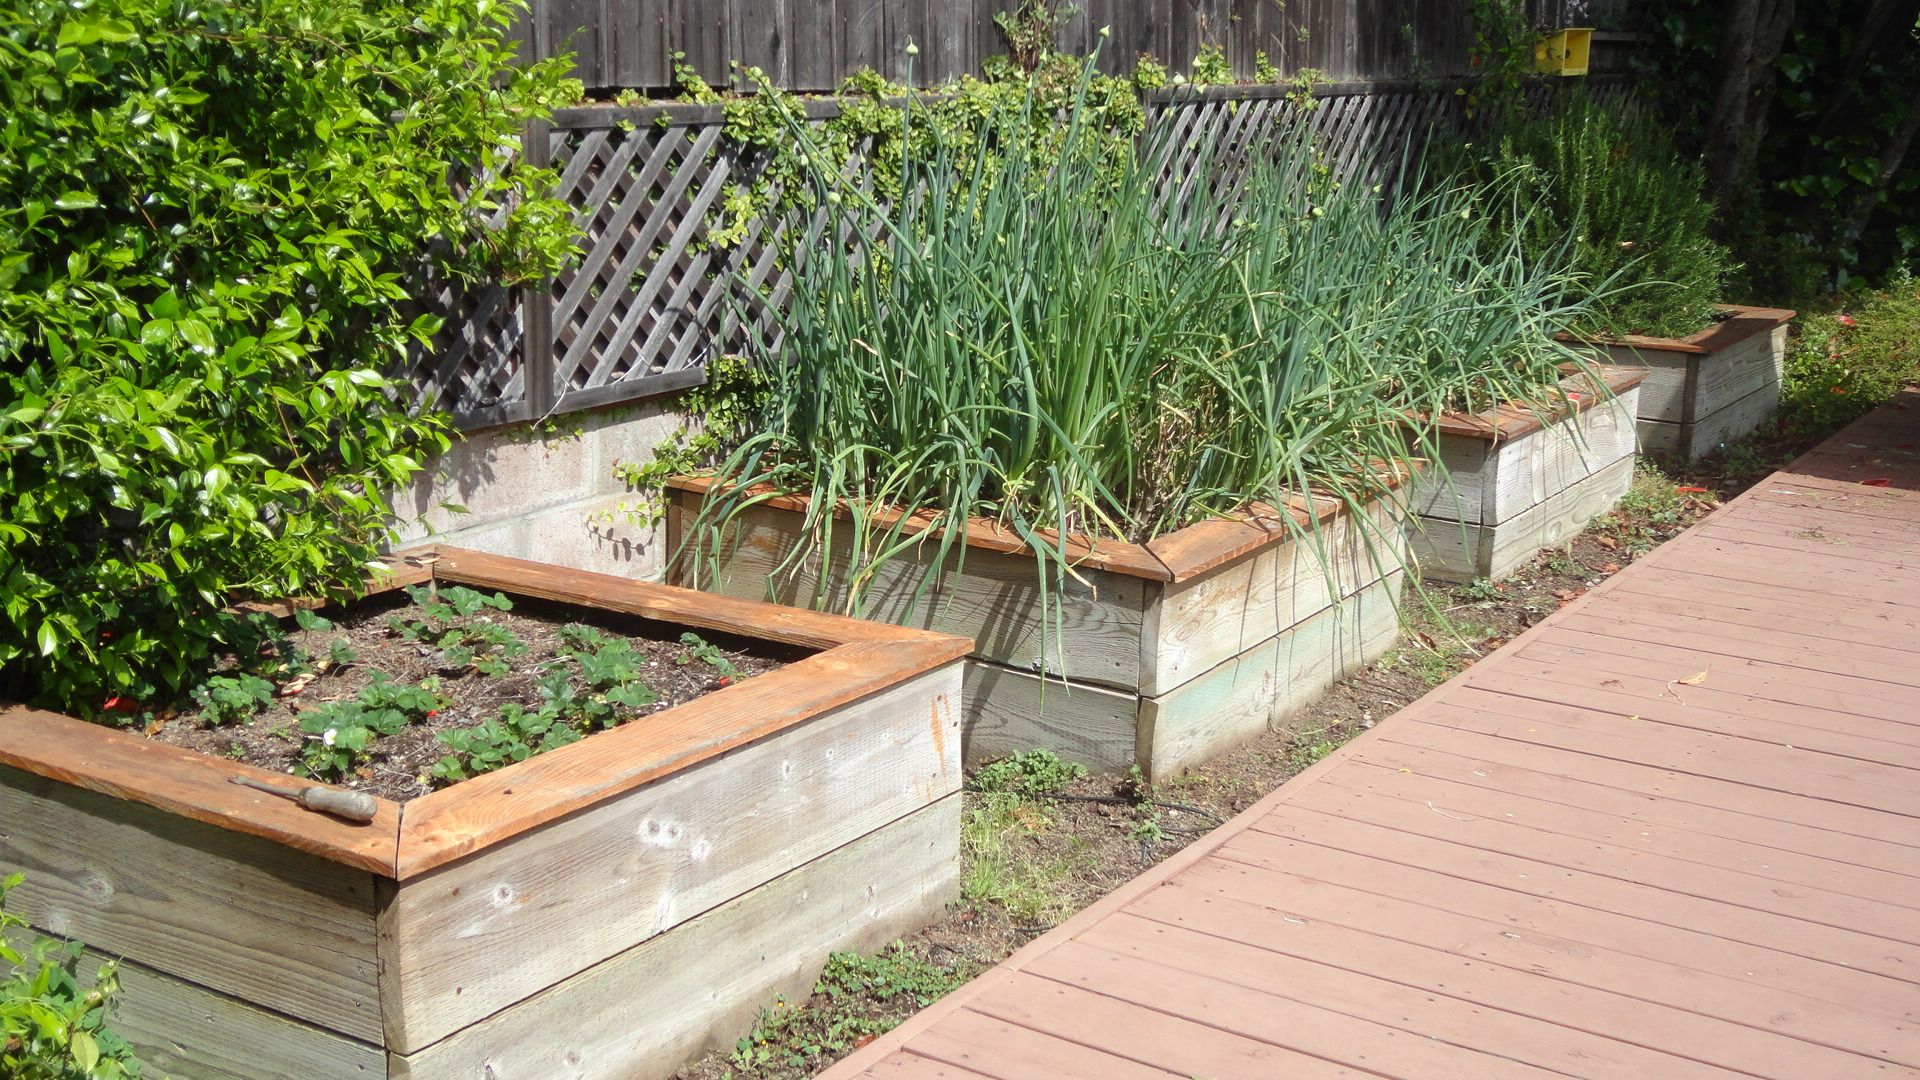
Viewers planter boxes
Its been really fun seeing some of the planter boxes people have been making.
*****
Chuck completed this one just two days before I posted my video. He used pressure treated lumber and cedar.


*****
Heres a clever idea from Daniel Clark. A mailbox planter box!

Read More..
*****
Chuck completed this one just two days before I posted my video. He used pressure treated lumber and cedar.
*****
Ron Ward made this redwood planter box and will be planting a Ficus tree in it.
Heres a clever idea from Daniel Clark. A mailbox planter box!
*****
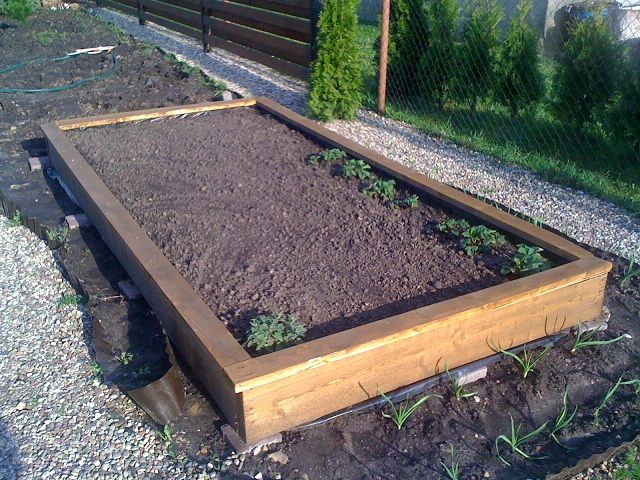
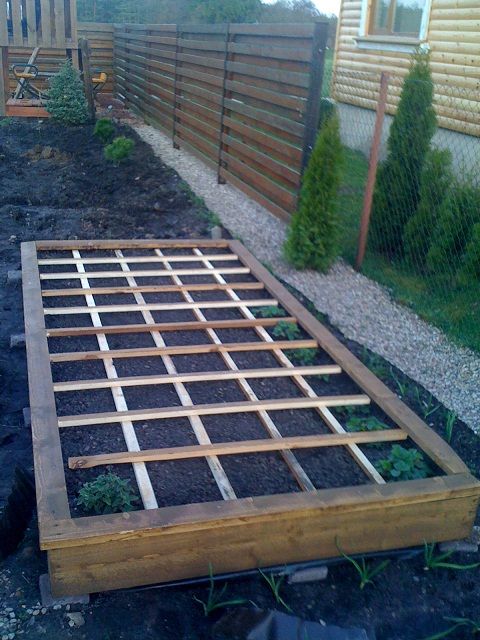
And from Lithuania, Kestutis built this very large raised bed planter.
*****
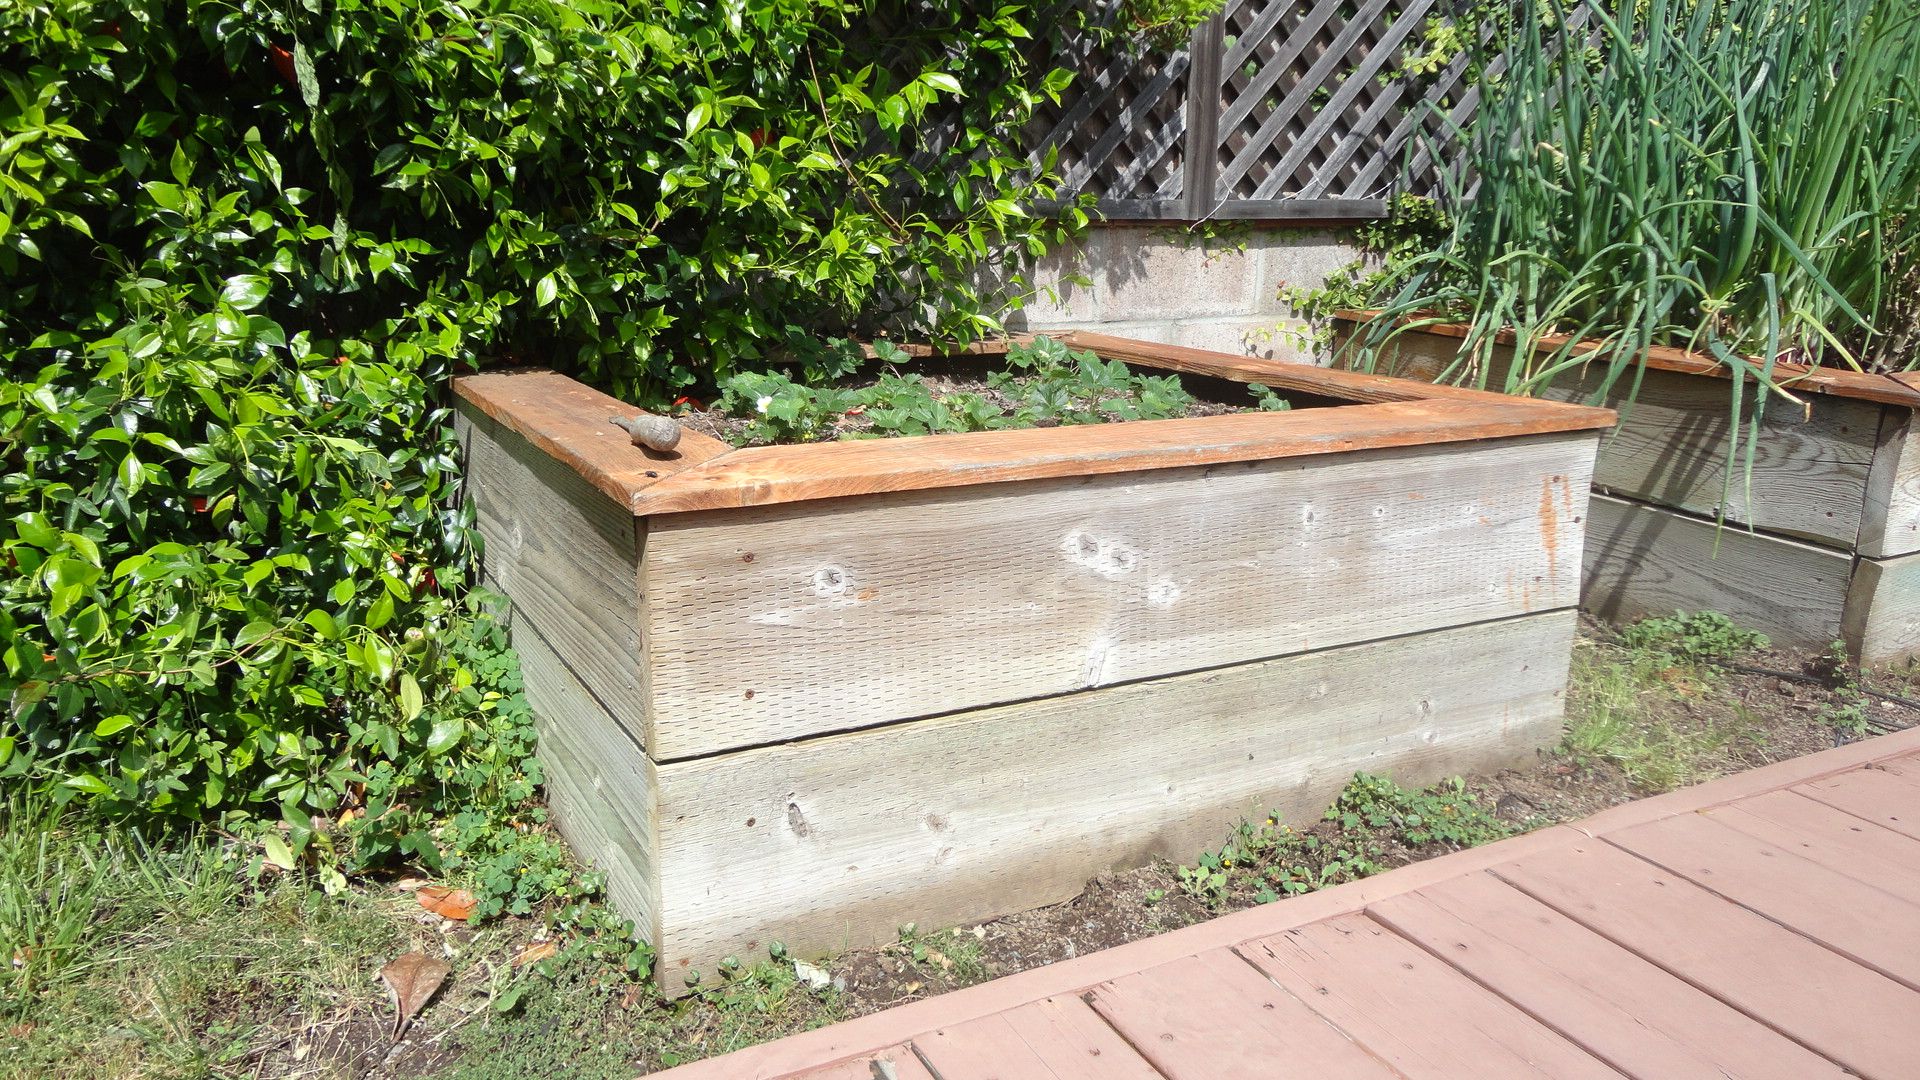
Here are my four raised beds I made many years ago with pressure treated lumber and redwood. Still holding up well.
*****
Mere Minutes
Tuesday, March 4, 2014
James Hetfield at the burger joint
Its been a busy week, but I am settling down with an eye toward the weekend. So heres a fun thing that happened today.
My son and I went out for lunch at a local burger place called "The Counter", where all the burgers are custom made. It was kind of confusing: they give you instructions on how to order and then a checklist and a pencil. It was a pretty decent burger, though.
In the table next to us was a guy sporting multiple tattoos, who looked familiar. Wyatt joked, "hey, its James Hetfield", Metallicas front man and guitarist.
 I turned around and chuckled. Yep, it did kinda look like him. I looked again. Wait a sec; he looks a lot like James Hetfield. We sat eating our lunches and pondering if it was James or not. When we heard his voice, it pretty much confirmed it. Finally, I just decided to go up and ask. I mean, it cant hurt to ask, right?
Sure enough, it was him! So he sat and talked to Wyatt all about guitars! I gotta say, James Hetfield is just about the nicest, friendliest man a guy could meet. I mean, how often does a 14-year-old kid get a chance to talk to not only his idol, but the guitarist from one of the biggest bands in the world? Awesomeness.
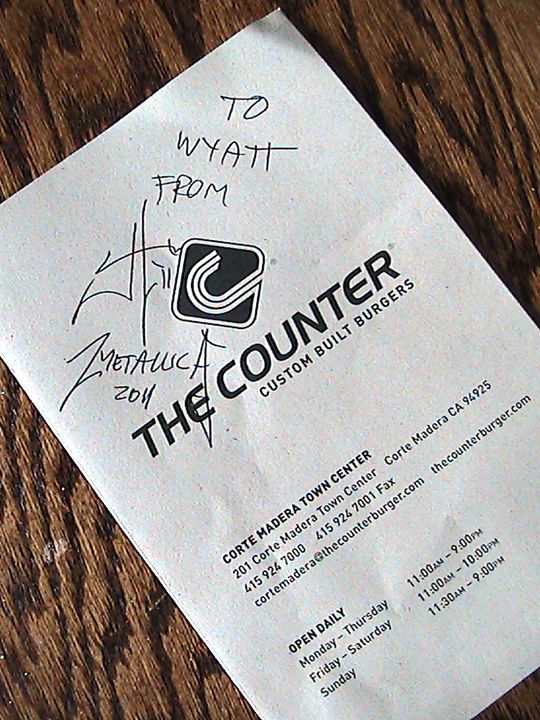
He gave Wyatt an autograph. And this is where I come in. I want to make a really special rock and roll kinda frame for it. Maybe in a guitar shape or something. Maybe include the Metallica logo. Im not sure, but it will be fun!
Heres one of my favorite Metallica songs:
Read More..
My son and I went out for lunch at a local burger place called "The Counter", where all the burgers are custom made. It was kind of confusing: they give you instructions on how to order and then a checklist and a pencil. It was a pretty decent burger, though.
In the table next to us was a guy sporting multiple tattoos, who looked familiar. Wyatt joked, "hey, its James Hetfield", Metallicas front man and guitarist.
Sure enough, it was him! So he sat and talked to Wyatt all about guitars! I gotta say, James Hetfield is just about the nicest, friendliest man a guy could meet. I mean, how often does a 14-year-old kid get a chance to talk to not only his idol, but the guitarist from one of the biggest bands in the world? Awesomeness.
Heres one of my favorite Metallica songs:
The puzzle cube
Heres a quickie project you can make in an hour. I found myself really humbled by the difficulty of making extremely accurate straight cuts with my less-than-Norm tools.
And if I could rant for a moment, I hate dealing with my bandsaw! It is such a pain in the ass to change blades. I practically have to disassemble the whole thing, then get it all aligned on the wheels, then tension it. I never really know if I got the tension correct. The whole process easily takes 20 minutes to half an hour. There has got to be an easier way. Plus, I hate making straight cuts on it. Im sure most of the problem lies in my technique. The blade always seems to drift. Its never as easy as setting up a fence on the table saw.
That said, this is a fun puzzle. And I swear, I must be really dumb because I always have to really think about it for a while to put it together!
Oh, and I got the inspiration last summer at the Marin County Fair:
Read More..
And if I could rant for a moment, I hate dealing with my bandsaw! It is such a pain in the ass to change blades. I practically have to disassemble the whole thing, then get it all aligned on the wheels, then tension it. I never really know if I got the tension correct. The whole process easily takes 20 minutes to half an hour. There has got to be an easier way. Plus, I hate making straight cuts on it. Im sure most of the problem lies in my technique. The blade always seems to drift. Its never as easy as setting up a fence on the table saw.
That said, this is a fun puzzle. And I swear, I must be really dumb because I always have to really think about it for a while to put it together!
Oh, and I got the inspiration last summer at the Marin County Fair:
Built in Dry Bar
Back in 2004, I was remodeling a house that was built in 1949. In the living room was a random two door closet. I decided to turn the closet into a built-in dry bar. I used a combination of left over Brazilian cherry and maple; I like the contrasting colors. These were the first cabinets of any kind that I had built, but they turned out pretty good I think. They are actually three separate cabinets. I had to do this because of the way the "closet" was configured so this was the only way to get the cabinets in the space. The finish is just a couple coats of Danish Oil and wipe on poly.
The first picture shows the base cabinets; I used full extension slides for the drawers and re sawed the maple for book matched doors.
The next pictures shows the two upper cabinets with the wine rack. The upper cabinets have glass doors on them and the wine rack will hold 15 bottles.
I built the top out of solid maple as well.
This last picture shows the "finished" product, but I somehow didnt have the top on when I took the picture.
Comments always welcome...
Read More..
The first picture shows the base cabinets; I used full extension slides for the drawers and re sawed the maple for book matched doors.
 |
| From DryBar |
The next pictures shows the two upper cabinets with the wine rack. The upper cabinets have glass doors on them and the wine rack will hold 15 bottles.
 |
| From DryBar |
I built the top out of solid maple as well.
 |
| From DryBar |
This last picture shows the "finished" product, but I somehow didnt have the top on when I took the picture.
 |
| From DryBar |
Comments always welcome...
Candle wall sconces
 This weeks project is completely different than what I started out with. Last week I asked for your suggestions for an Olympic themed project. Lots of good ideas, and a lot of you wanted something with an Olympic torch.
I gave this a lot of thought and decided that a wooden torch was probably not a project that would hold wide appeal. This led me to the notion of creating a torch intarsia: piecing together various types of wood into a torch "picture". (If you are interested in this process, you can see a scarecrow I made a couple years ago.) After designing a few templates, it quickly became clear that a torch would only require a few cuts. Not much of an intarsia project.
Still exploring the idea of a torch, I thought perhaps a wall sconce shaped like a torch would be interesting. I spent quite a bit of time designing one, but kept running into design questions. Mostly, the candle seemed to be competing with the shape of the torchs flame making the overall concept confusing.
Sometimes just spending time in my shop leads to inspiration. Looking through my scraps of lumber, I discovered a tiger-stranded bamboo board a viewer sent me a while back. It has a crazy grain pattern that reminds me of flames. Suddenly I had the inspiration I needed. Though not Olympic themed, it retains the torch idea and is something that will hold wider appeal, especially after the 2014 games are over.
Plans
- WWMM Wall sconces (pdf)
- SketchUp file
 Own this pair of wall sconces
Bid now!
Hurry...auction ends next Friday.
Hurry...auction ends next Friday.
If you would like to own this pair of sconces, you can place a bid here! Auction runs until next Friday and I am donating 100% of the winning bid to the Make-A-Wish Foundation. I make a lot of stuff and it really feels good to be able to reduce my clutter, send a project to someone who can enjoy it, and help out children who are going through some awful times.
Monday, March 3, 2014
The Kreg Jig
Okay, so one of the perks of making YouTube videos is that sometimes major manufacturers send you free stuff. Last week the folks at Kreg Tools sent me a Kreg Jig and asked me to make a video using it.
If you are not familiar with Kreg, it seems their flagship product is the Kreg Jig. Basically, its a pocket hole jig, but its really cool. It makes me think about retiring my biscuit joiner.


Read More..
If you are not familiar with Kreg, it seems their flagship product is the Kreg Jig. Basically, its a pocket hole jig, but its really cool. It makes me think about retiring my biscuit joiner.
So Ive been trying to come up with a cool project using it. I mean, aside from building cabinets and the like. My woodworking process is a hit-or-miss proposition. I have an idea for a gift project to make, but am struggling with the design. Heres an example of my preliminary work:
As you can see, I really need to learn some sort of CAD program. Maybe Google Sketchup? What I think I will end up doing is just cutting wood and haphazardly start putting it together.
Well, heres a picture of the jig and perhaps why Im not getting anywhere.
What inspires Richard Morley

 With a background in aerospace engineering and "too many years of education", Richard Morley became dissatisfied sitting behind a desk and decided to pursue his passion for wood. He has a small workshop in England where he does property maintenance and takes on small commissioned projects.
 I first met Rick on Keek and was intrigued by his enthusiasm and laid-back demeanor as well as his unique, light-filled shop. On his YouTube channel he creates small, approachable projects and has a fantastic series well worth watching called Routing 101. Even if youve been using a router for a while, this series will really help out with all sorts of tips and pointers.
Be sure to check out his web site, Woodcraft by BPW; an English Workshop.
For The Inspiration Project, Rick shot a video about what inspiration means to him. I love the quote he cites: "No one gets remembered for the things they didnt do."
*****
*****
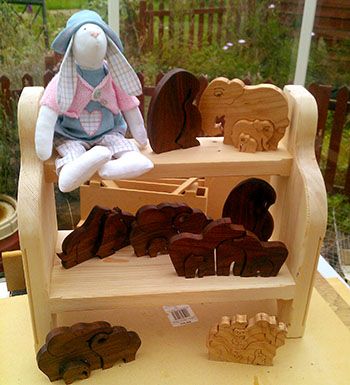
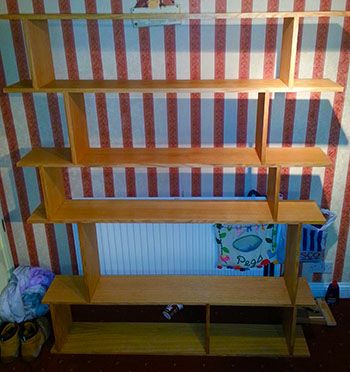
Gallery
Some of my early turning projects, mostly these were just playing around with scrap wood and logs, before committing to more expensive shavings! Fairly early on I joined a woodturning club, something I would advise every one of all levels to do. Not just from an exposure point, but also because you can learn and advance at much faster rate than just playing in your shed! The apple knife was a competition entry in the beginners’ class which actually got first place. I think about 3 of us entered that month!
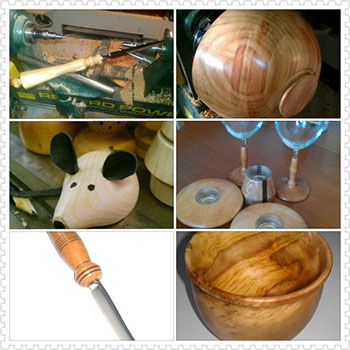
I found out about decoupage via my other half, and this piece came about purely by chance, dont be afraid to experiment - but also dont be surprised to find out that others may have thought of it before you.
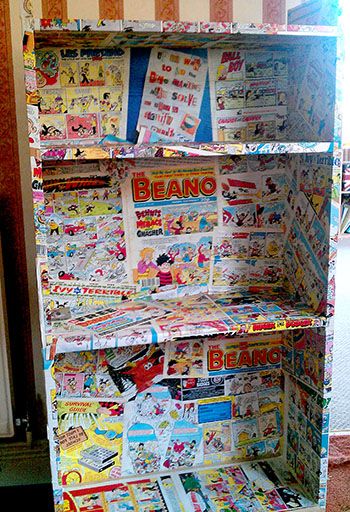
I went through a phase of scroll sawing, these gifts were taken from plans in a scroll sawing book, a great source of ideas.
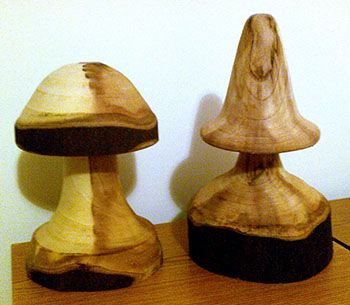
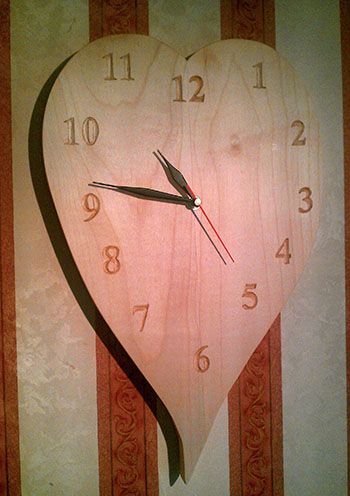
This clock is made from sycamore, it was a commissioned piece and all the numbers are hand carved. Its the first hand carving, and mostly likely the LAST, I think I’ll do). I have great respect for carvers!
Another commission, Oak veneered MDF, for a friend and guy I used to work with, within 6 hours of having delivered it the 18 month old girl had drawn on it. It was left as a lifelong reminder.
The Steve Ramsey wooden tie! I made this for an uncles Christmas present - to go with his wooden belt. Thanks Steve, got me out of a hole that time!

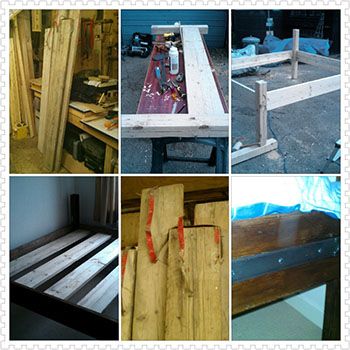
This bed was made from watching an episode of "The Salvager" with Rico Daniels. I had lots of old rotten fence posts from a huge fencing contract at the time, and got the scaffold boards from a friend. Also Id just moved house and had got sick of sleeping on the floor!
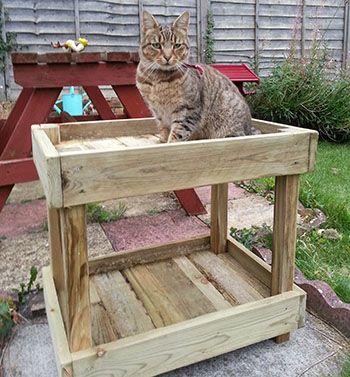
A plant pot/potting stand made for a lovely lady, and regular customer. The cat also approved!
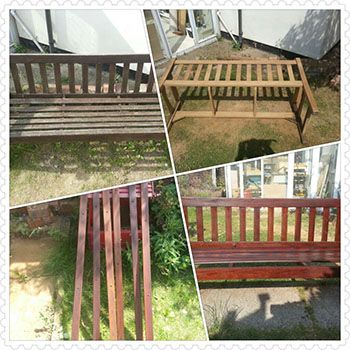
It bugs me seeing old garden furniture sitting their rotting away, this bench is actually made from Teak, and had not been looked after very well. A few, (LOTS actually), hours of sanding and 4 coats of linseed oil and it was reborn!
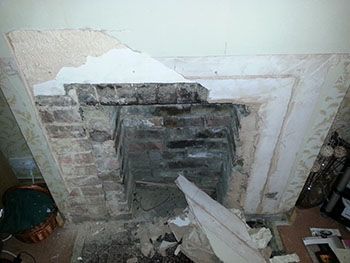
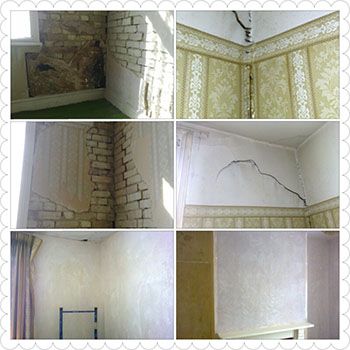
I also do plastering, gypsum and traditional Lime work. My other half decided to replace a 70s gas fire with wood burner (No idea where she gets her fuel from :-) ), so I had the job of re-doing the fireplace, We just HAD to have a nice oak mantle!
This project was great! I was asked to remake a casement for a wooden window, you can see how bad it had got, just like the bench, timber needs a little love every once in a while.
Another restoration project, I got asked to look at some "cracked plaster". All new plastering with slaked lime putty and horse hair.
Around the globe on a Saturday more wooden wall maps
A month ago I invited you to create your own wall hanging showing off where you live and post a video response. The videos are still rolling in! Here are a few more. (Or you can see them all on YouTube.)
Colorado. (I knew someone could get creative with a rectangle!)
West Virginia.
Nigeria.
Georgia.
Oregon.
New Zealand.
Louisiana.
Sunday, March 2, 2014
Its the Small Things


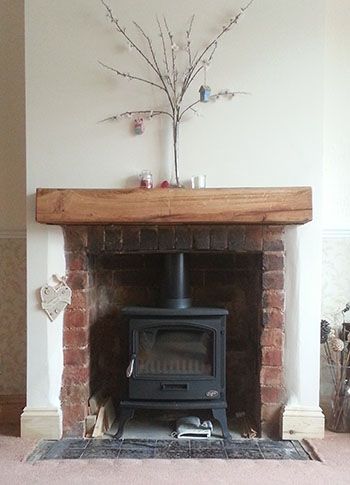
Faux Fireplace
I love fireplaces. To me, they warm your soul, not just your body. Since hubby and I have been married, Ive dreamed of having one. I grew up having a fireplace. I loved helping my dad carry in wood and build a fire during the cold winter months. He taught me all about kindling and what worked best. Sometimes, he would even let me start it myself and I always felt so proud when I was able to get a fire going as good as he could. To this day the scent of a fireplace burning somewhere in the air outside takes me right back to those special times with my dad. It stops me in my tracks and I remember how much pride he seemed to take in building a fire for his family on cold evenings.
Our house doesnt have one and since I cant build a functioning fireplace, I decided to do the next best thing, a faux version. It might not be just like what I had growing up but it certainly reminds me of that and brings back wonderful memories. And hopefully it will provide a feeling of warmth for our kids too.

I used the cheaper wood from Lowes that is full of knot holes and it cost me a little under $100 to build. I followed this tutorial, somewhat. It took me an afternoon to build and I painted and added the barn wood the next day. Not too bad as far as being time consuming. And it really wasnt as hard as I thought it was going to be. Ive wanted to build one forever but always felt it was too intimidating. It wasnt once I got started.

To achieve a glowing "fire" look, I built a box from the remaining scraps of barn wood and filled it with burlap, Christmas lights and wood logs. To really make it seem real and have a little fun with it, I play my crackling fire in the fireplace app on my ipad. :) A couple of times, I even caught myself going to stand in front of it to "get warm". Silly, I know.

I am so happy with it and really, when I look at it, I cant believe I did it. I know my dad would be super proud.

For the top, I used an extra thick piece of barn wood that I sanded down and waxed.

I decided against using candles in the box as I didnt want to be worried about wax dripping everywhere, which seems to always be a problem when I group candles together and burn them. Luckily, there is an outlet directly behind the barn wood so I cut a small hole in the wood to provide an opening so I could plug in the lights and have it be perfectly hidden.

Cant wait to decorate it for the holidays!!
Have a wonderful day!
Follow along between posts on Instagram!
Read More..
Our house doesnt have one and since I cant build a functioning fireplace, I decided to do the next best thing, a faux version. It might not be just like what I had growing up but it certainly reminds me of that and brings back wonderful memories. And hopefully it will provide a feeling of warmth for our kids too.
I used the cheaper wood from Lowes that is full of knot holes and it cost me a little under $100 to build. I followed this tutorial, somewhat. It took me an afternoon to build and I painted and added the barn wood the next day. Not too bad as far as being time consuming. And it really wasnt as hard as I thought it was going to be. Ive wanted to build one forever but always felt it was too intimidating. It wasnt once I got started.
To achieve a glowing "fire" look, I built a box from the remaining scraps of barn wood and filled it with burlap, Christmas lights and wood logs. To really make it seem real and have a little fun with it, I play my crackling fire in the fireplace app on my ipad. :) A couple of times, I even caught myself going to stand in front of it to "get warm". Silly, I know.
I am so happy with it and really, when I look at it, I cant believe I did it. I know my dad would be super proud.
For the top, I used an extra thick piece of barn wood that I sanded down and waxed.
I decided against using candles in the box as I didnt want to be worried about wax dripping everywhere, which seems to always be a problem when I group candles together and burn them. Luckily, there is an outlet directly behind the barn wood so I cut a small hole in the wood to provide an opening so I could plug in the lights and have it be perfectly hidden.
Cant wait to decorate it for the holidays!!
Have a wonderful day!
Follow along between posts on Instagram!
Mailbox Ideas
I love a good spray paint project. It is the cheapest way to give something a new look, so, when Krylon contacted me and asked if Id be interested in trying some of their new spray paint, I was thrilled at the opportunity. I chose their new Rust Protector quick drying spray paint in Copper Metallic and Aged Brass Metallic and I loved it.

The timing couldnt have been more perfect as I had picked up one of these copper post caps at Lowes on clearance not too long ago and thought it would be perfect for something,
I just wasnt sure what yet.

Then inspiration hit. Our cheap basic mailbox has been looking pretty sad for the last few years so why not give it a facelift. The spray paint I chose was perfect as it is a rust protector and of course, a mailbox is exposed to all kinds of weather so thats what it needed. I was also pretty happy that I selected copper and aged brass for my choice of colors. The mailbox would also tie in nicely with my copper porch curtain rods.
Heres a before shot of the sad looking mailbox.

Pretty dull, huh? You might be wondering why anyone would care about sprucing up something as simple and basic as a mailbox and the answer is, I would. Im just that kinda gal. I like to think that simple mundane objects, like mailboxes, as part of a home,
deserve to look good, too.
So heres what I did......
As usual, I wanted this project to be as cheap as possible, so we went hunting for some rustic wood, as in, beside the road, free. No problem.
We found a 4 x 4 and a 2 x 4, both dirty and old, just like I wanted.

First I prepared the wood by hosing it off, letting it dry and then sanding it with 180 grit sandpaper. I wasnt going for perfection here, after all, it was going to be outside. Next, I brushed on some special walnut stain and set them aside to dry.

Next up, the mailbox. After cleaning and removing the old number stickers, I spray painted the flag first with the aged brass metallic.

While that dried, I grabbed a package of these.

They are foam letter and number stickers available in any craft store. I wanted to personalize our mailbox and also create an embossed metal look. I added our name to one side and our address to the other side. Then I taped off the already painted flag and spray painted the mailbox with the copper metallic paint. I gave it a good 4 or 5 coats.
It is a fast drying spray paint and it certainly lives up to that.
It was almost dry before I got around to the other side of the box.
Mailbox done.
The next part, building the post, was a bit difficult and I didnt take photos. It took two pairs of hands, which required hubbys help and stopping for photos isnt his thing. :)
After the entire thing was complete, I added the copper end cap to the top of the 4 x 4 post with a little glue and heres how it looks now.

We are pretty happy with how it turned out. And we finished just in time as about 10 minutes after this photo, a huge storm hit. But the spray paint held up great!

I cant wait to add some mums and pumpkins to the base
of it for a little Autumn decoration. :)
Heres a closeup of the foam stickers.

The adhesive on the back is pretty strong so Im confident they arent going anywhere.

This was a pretty fun way to spruce up a cheapo mailbox and I loved how fast the paint dried!
Thanks Krylon!
I am certainly no expert, but here are a few spray painting tips that have helped make spray painting easier for me.
* Always keep your spray paint back about a foot from whatever your painting.
If youre too close, your paint will go on too thick.
* If youre spraying, your arm should be moving. If it isnt,
this will also cause too much paint in a single area which causes the paint to run.
* Its always better to do several light coats instead of one heavy coat in an
attempt to hurry and get it done. I learned my lesson on that one over and over.
* If you have to stop to make dinner or do a load of laundry like me, wipe the excess paint off the spray valve. That way it wont get a weird clog and spray out the side,
painting your face when you resume working on your project. :)
If any of you have any other helpful tips, please feel free to leave them in the comment section and I can add them to this post. :)
Have a great day!
Diana
Subscribe to:
Comments (Atom)